
No photo? No problem. Quick Log lets you describe a meal out loud or type it, and the AI analyzes it just like a scan — perfect for meals you’ve already eaten or food that’s hard to photograph.
When to Use Quick Log
- You already finished the meal before remembering to log it
- You’re at a restaurant and don’t want to photograph your plate
- You’re logging yesterday’s dinner from memory
- It’s something simple — “coffee with cream” doesn’t need a photo shoot
It’s also the right tool for drinks with nutrients in them. Logging “a glass of orange juice” through Quick Log captures the potassium and the fluid, which plain water logging doesn’t — see Tracking Fluids.
Starting a Quick Log
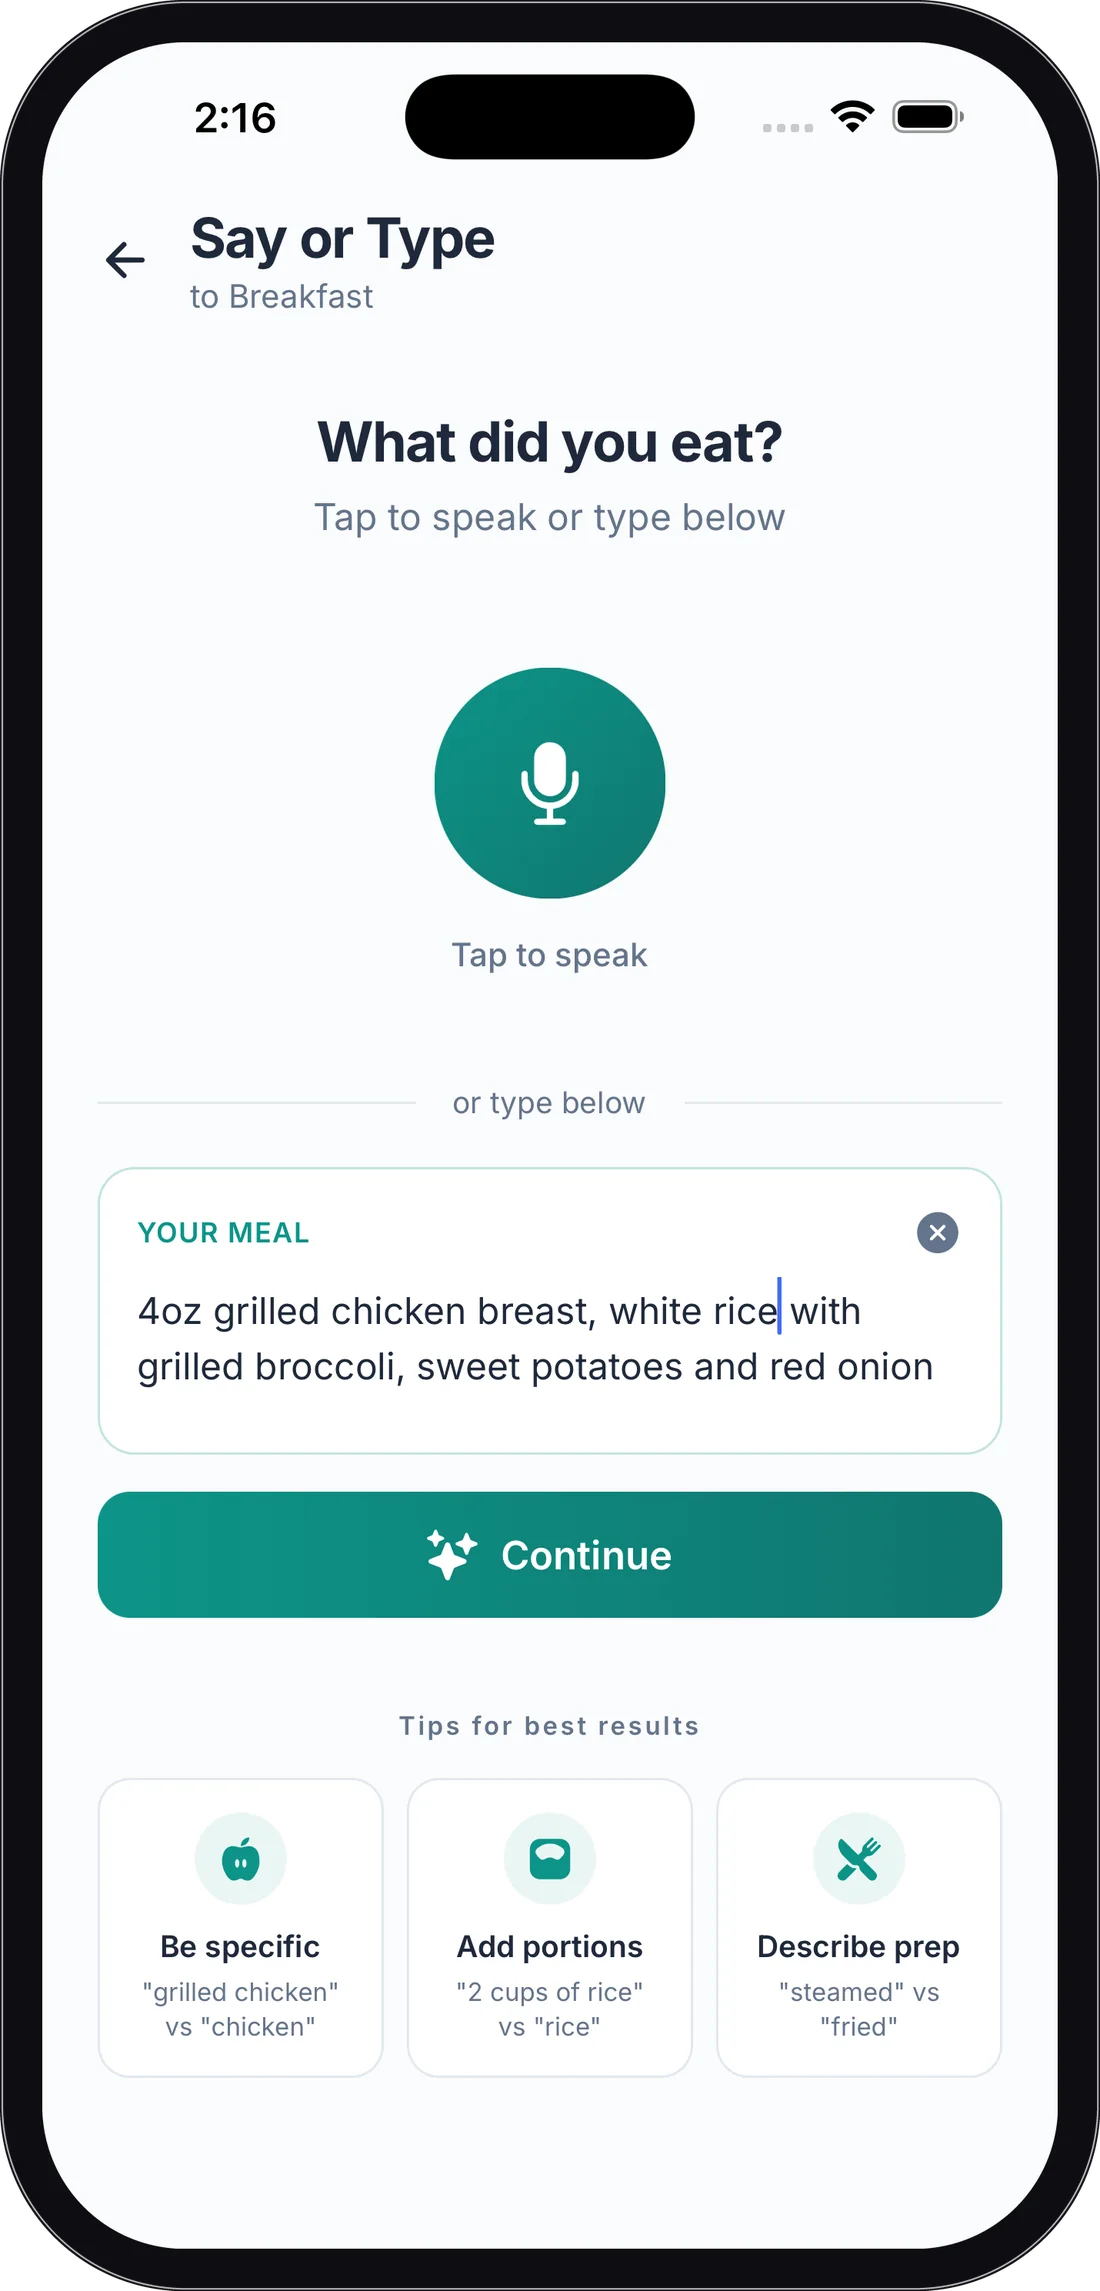
From your diary, tap + Add in any meal section and choose Say or Type (“Describe your meal”). The screen shows which meal you’re logging to — for example, “to Breakfast.”
Logging by Voice
- Tap the big microphone button (Tap to speak).
- The first time, allow microphone access when asked.
- While it shows Listening…, describe your meal naturally: “Two scrambled eggs, a slice of toast with butter, and coffee.”
- Tap the button again to stop (Tap to stop). Take your time — pausing between items is fine, KidneyPal keeps listening until you tap stop.
Your words appear in the text box below, so you can fix anything the speech recognition misheard before continuing. Forgot something? Tap the microphone again and keep talking — the new words are added to the end of what’s already in the box. To start over, tap the × above the text. If voice isn’t available on your device, just type instead.
Logging by Text
Prefer typing? Use the text box under “or type below.” The placeholder shows the idea: “2 eggs, toast with butter, coffee”. A plain, comma-separated list works great — no special format needed.
When you’re happy with the description, tap Continue. You’ll see Processing… for a few seconds while the AI identifies each food and estimates its nutrients.
How to Phrase It for Best Results
The more specific you are, the better the estimate. The app’s own tips:
| Tip | Instead of… | Say… |
|---|---|---|
| Be specific | ”chicken" | "grilled chicken” |
| Add portions | ”rice" | "2 cups of rice” |
| Describe prep | ”fried" | "steamed” |
A few example entries that work well:
- “Bowl of oatmeal with blueberries”
- “Grilled chicken salad, no tomatoes”
- “Leftover pizza, 2 slices”
- “Coffee with cream”
Tip: Mention brand names when you know them (“Campbell’s chicken noodle soup”) and anything that changes the numbers (“low-sodium,” “rinsed canned beans,” “no added salt”). The AI uses every detail you give it. If you never salt the food you cook at home, turn on I cook without added salt in Settings → Diet Preferences instead of saying it every time — see Settings.
If the AI can’t find any food in your description, you’ll see No Food Detected — just go back and try a clearer description.
Reviewing Before You Log
After analysis you land on the Review screen. At the top, a “You said:” card shows your original words so you can compare them against what the AI understood.
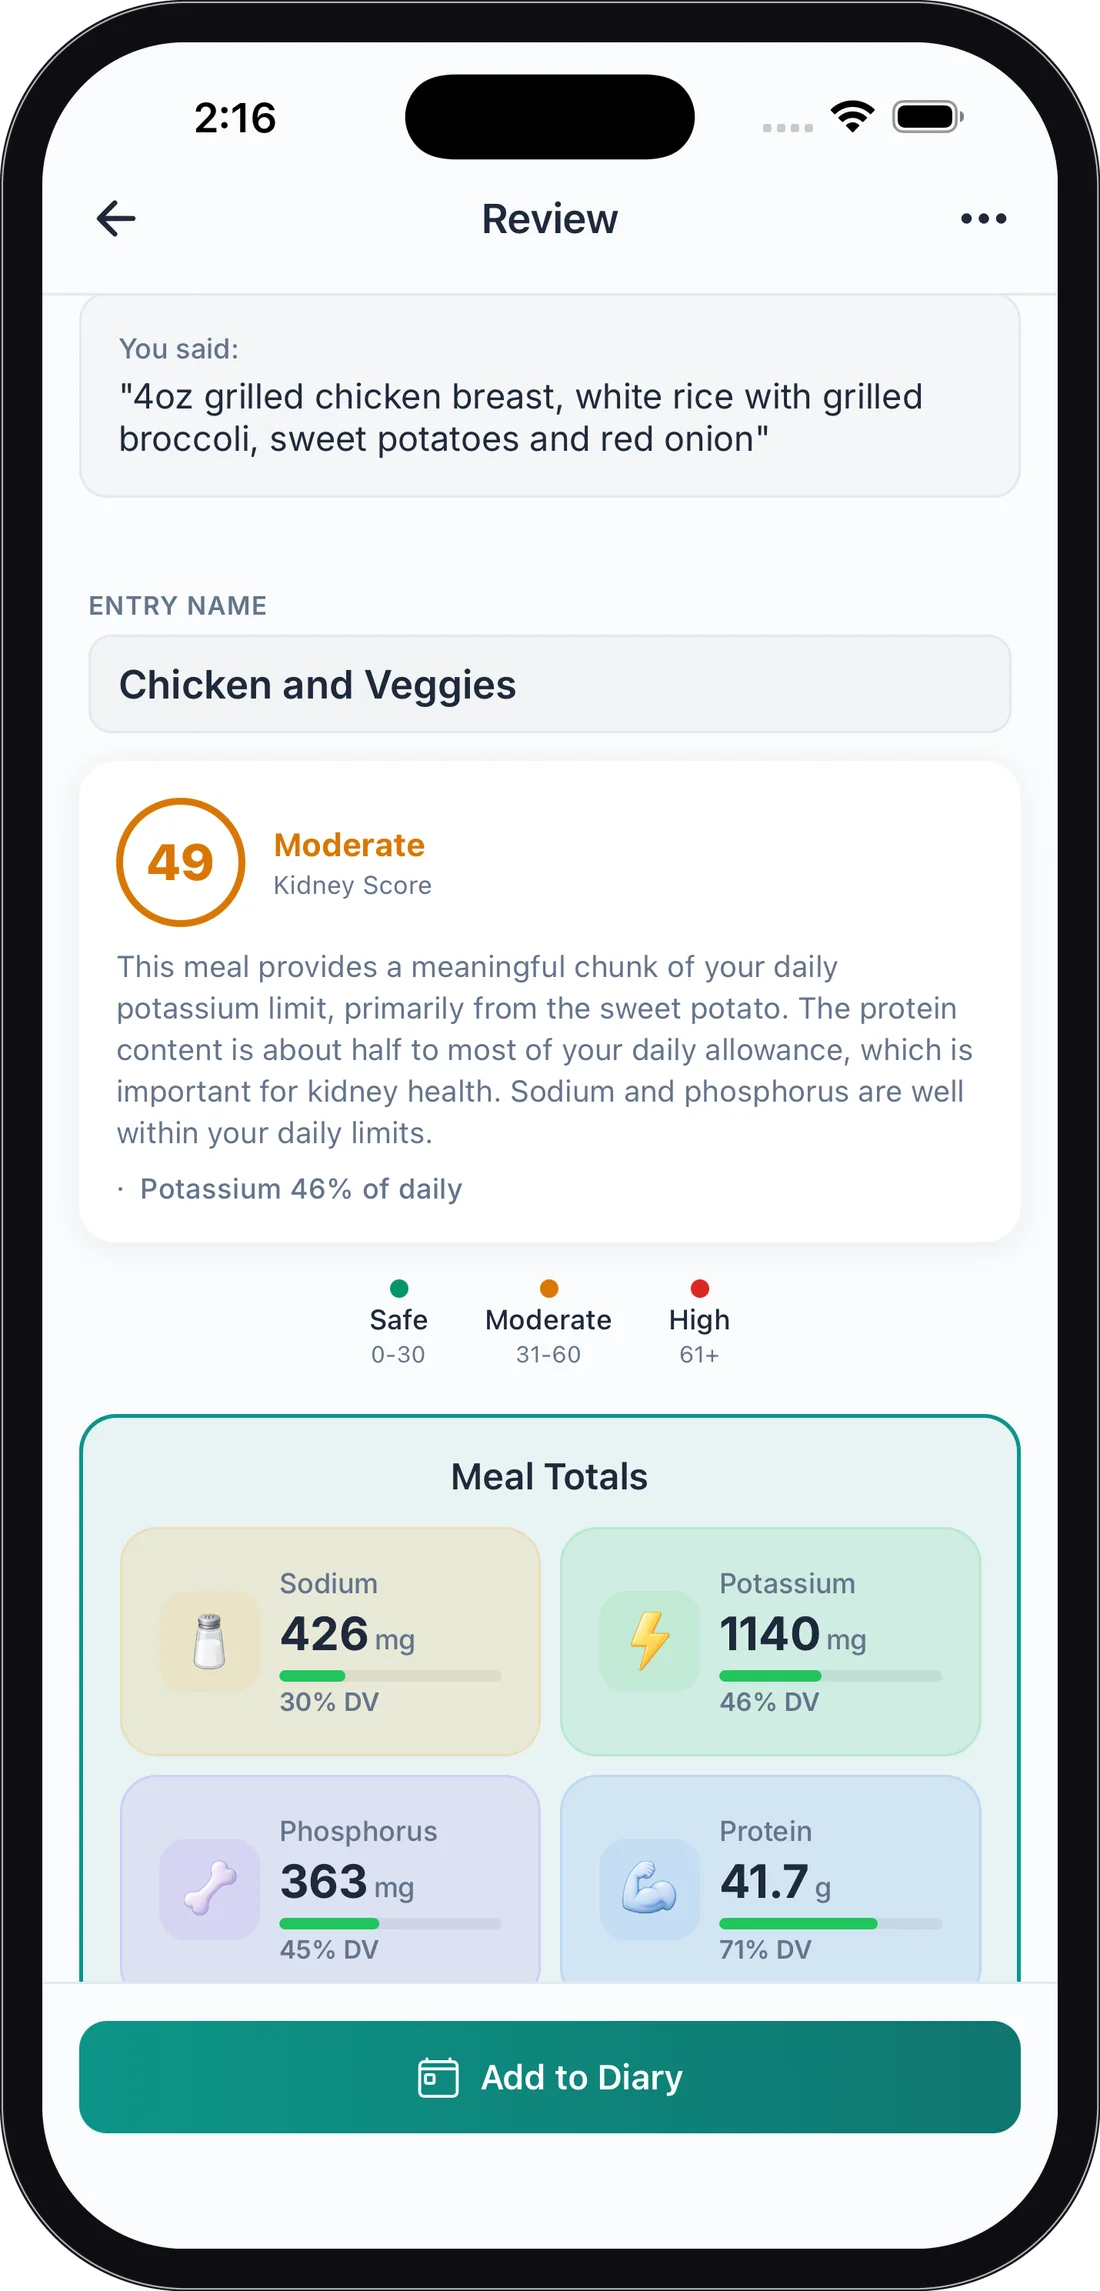
The rest is the standard analysis: Kidney Score, meal totals against your daily limits, each identified food with its Safe / Moderate / Limit rating, Smart Swaps, and a tip (both can be hidden in Settings → Meals & Recipes) — see Scanning a Meal for a full walkthrough. Before logging, take a quick pass through the foods:
- Remove anything the AI added that you didn’t eat
- Edit any food to fix the portion or nutrient values — the Kidney Score is recalculated to match
- Got it wrong entirely? Tap Not right? Tell us what it is under the result and describe what you actually had to have it analyzed again
- Use the ⋯ menu to Re-analyze with details if you forgot something, ask the AI a question with Ask About Meal, Add Photo to give the entry a picture, or Save to Favorites for one-tap logging next time
If you typed one amount for a single food — say “15 ml milk” — and the estimate came back for a different amount, a yellow banner at the top says so: You typed 15 ml — this estimate is for 1/2 cup. Edit the amount before logging. Tap Edit amount to open the food’s quantity editor with your amount already filled in; save it and the nutrients rescale to what you actually had. The app never changes the amount you typed. (Two amounts in one description, like “1 cup of milk with 2 tbsp honey”, aren’t checked this way.)
Plain milk gets one extra check. If you typed just an amount of plain milk — “15 ml milk” or “1 cup of skim milk”, say — and the estimate is for your amount but its numbers don’t fit it, KidneyPal uses USDA milk values for that amount instead, and a note under the result says so: Nutrients set from USDA values for 15 ml of milk. If you didn’t say which milk, it assumes 2% and the note adds assuming 2%. If the numbers look off but can’t be matched to a plain milk, they’re left as they are and a note asks you to check them, with an Edit food button. The note goes away once you edit the food. Flavored, plant-based, lactose-free and other special milks aren’t checked this way.
When it looks right, tap Add to Diary and choose the meal. Done — the nutrients land in your diary immediately.
Adding a Photo
Voice and text logs don’t have to stay picture-less. To keep a visual of what you ate, open the ⋯ menu on the Review screen and tap Add Photo — take one on the spot or pick one from your photo library. The photo appears at the top of the analysis (tap it to view it full screen) and becomes the entry’s picture in your diary and Saved Foods, replacing the microphone icon. Once an entry has a photo, the same menu item reads Change Photo.
The photo is purely decorative: your analysis, Kidney Score, and nutrient numbers never change when you add one. If you want the AI to reconsider the meal itself, that’s what Re-analyze with details is for.
You can also attach a photo after the meal is already logged:
- In your diary — tap the voice-logged entry to open it, then use its ⋯ menu → Add Photo.
- In Saved Foods — open the food and choose Add Photo from its ⋯ menu. (Foods saved before this feature existed may not offer the option — saving the food again from a fresh log fixes that.)
- On the web — the entry editor and the saved-food view have an Add Photo button, and once a photo exists, a small Change Photo button sits on the photo itself.
Photos sync across your devices: attach one on your phone and it shows up on the web app too, and vice versa.
Saved Foods: Your One-Tap Library
The fastest log of all is one you don’t have to describe. Anything you Save to Favorites lands in your Saved Foods library, ready to re-log with all its nutrients intact — no new analysis, and it doesn’t count against your daily limit. Open it from your diary with + Add → Saved.
Tip: Want your whole library in a spreadsheet — to plan meals, compare foods side by side, or send to your dietitian? See Exporting your saved foods.
Logging one food
Tap a food to open its full analysis and add it from there, or swipe the card left and tap the + button for a quick add — pick the date, servings, and meal, then tap Add to Diary. Either way you get a quick “Added to diary!” confirmation and stay on the list, so logging several things is one visit, not four.
The + quick-add sheet remembers your portion, in the app and in the web app: it opens on the number of servings you used the last time you logged that food, labeled Last time: 1.5 when it isn’t a plain single serving. Always eat half a bagel? Set it once and every later quick add starts there.
Renaming or correcting a saved food
Tap the food to open its Saved Food screen. The name sits in the Entry name box near the top — it looks like a plain grey field, but it’s a text box: tap it, delete the old name, and type the new one. On the same screen, tap Edit on any item to correct its quantity or nutrient amounts (the small Edit Item line at the top of that editor is a heading, not a button). The Kidney Score is recalculated from the corrected foods, the same way it is on a scan result.
Once you’ve changed something, a Save Changes button appears above Add to Diary — tap it to store your edits on the saved food without logging anything. Your edits are also stored when you tap Add to Diary and choose a meal.
Logging several at once
Rebuilding a whole meal from saved items — say coffee, toast, and eggs? Long-press any food to start selecting, tap the others you want (or use Select All), choose the meal at the bottom, and tap Add 3 to Breakfast. Everything lands in your diary together, each at one serving, with a confirmation like “3 added to Breakfast.” Tap Cancel in the top corner to leave selection mode.
While selecting, the ⋯ button beside the meal picker opens four more actions: Tag meal time, Set category, Add to shopping list, and (with two or more foods selected) Combine into one favorite — all explained below.
Grouping by meal time
Choose Meal time in the sort menu and your library reorganizes into Breakfast, Lunch, Dinner, Snacks, and Other sections. A row of filter chips appears under the search bar — All, then one chip per group with its count — so you can jump straight to your lunch foods without scrolling. A food you eat at more than one meal appears in each of its groups.
You mostly don’t have to file anything yourself. Your existing library was sorted automatically from your diary history (which meals you’d actually logged each food to), saving a food from a diary entry tags it with that entry’s meal, and every time you re-log a saved food the meal you pick is added to its tags — so the grouping keeps up with your real habits. Foods the app has never seen at a meal wait in Other.
To file foods by hand, long-press to select one or more, then tap ⋯ → Tag meal time. The four meal chips show the current tags — toggle any combination and tap Apply. Clearing every chip moves the food back to Other.
Grouping by grocery category
Choose Category in the sort menu instead and the same library regroups into grocery-style sections — Produce, Meat & Fish, Dairy & Eggs, Breads & Grains, Snacks, Beverages, Coffee & Tea, Condiments & Sauces, Desserts, Supplements, Meals, and Other — again with a row of filter chips under the search bar so you can jump straight to a section. New saved foods are filed automatically when the app can tell what they are; anything it can’t place, plus foods saved before categories existed, sits in Other until you file it. Supplements is never chosen automatically: you file your vitamins and supplements there yourself.
To file foods yourself, long-press to select one or more, tap ⋯ → Set category, pick a category, and tap Apply. Tapping the highlighted category again clears it. The same categories organize your shopping list.
Supplements in one tap
Put your vitamins and supplements in the Supplements category, then choose Category in the sort menu and tap the Supplements chip. An Add all to today button appears above the list: pick the meal and tap Add 4 to Breakfast (your count and meal), and one serving of each supplement in the category is logged to today, even if your diary is showing another day. The same category feeds the + My supplements shortcut in Plan my day.
In the web app, Supplements is a category too, with the same Add all to today button on the Saved Foods page (sort by category, then click the Supplements chip). Editing a saved food on the web keeps its category unless you change it.
Sending foods to your shopping list
Out of something you keep saved? Long-press to select the foods, tap ⋯ → Add to shopping list, and they land on your shopping list under their grocery categories, merged with anything already there. Products you saved from the old Browse mode (removed in 4.46) are here too, so next trip’s list is one selection away.
Combining favorites
If you always eat certain saved foods together, merge them: long-press to select two or more, tap ⋯ → Combine into one favorite, adjust the suggested name if you like, and confirm. The new favorite carries the summed nutrients and the full ingredient list of everything you merged, and re-logs as one item. Your original saved foods stay in the library untouched.
Finding things
Use the search bar, or the sort button beside it to order the list by Recently Added, Most used (recent logs), Name, Safety Level, Meal time, Category, Sodium, Potassium, Phosphorus, or Protein — handy when you’re low on potassium budget and want your gentlest saved foods on top. Tap the active sort pill to flip the direction (low to high, or high to low), and your choice is remembered next time. Search works inside the meal-time and category groups too. Most used puts the foods you’ve re-logged from Saved Foods most often at the top, counted across your recent diary entries (your last 500 logs), with ties going to the one you used most recently — so the foods you actually eat rise to the top without any tagging. It works the same in the web app.
To remove a food from the library, swipe its card left and tap the broken-heart button — or tap the heart again on the original analysis. And if you ever forget a gesture, the ? button at the top of the screen lists everything the Saved Foods screen can do.
Exporting your saved foods
On your phone, tap the share icon at the top of the Saved Foods screen. KidneyPal builds a spreadsheet (a CSV file named like kidneypal-saved-foods-2026-09-23.csv) and opens your phone’s share sheet, so you can save it to Files, email it, or open it in Numbers, Excel, or Google Sheets. In the web app, click Export CSV on the Saved Foods page instead — it downloads the same file.
The file lists every food currently shown — your search and filters apply — one row per food, with its serving, category, safety level, meal times, calories, every nutrient per serving, fluid, and your notes. Exporting is free. Pro members with acid load turned on also get an Acid load PRAL (mEq) column per serving, filled only when the food’s acid load could be calculated in full and left blank otherwise.
The Daily Limit
Each Quick Log analysis counts toward the same free allowance as scanning: 5 AI analyses per day across photo, label, barcode, and voice/text combined. Only a successful analysis counts. The badge at the top of the Quick Log screen and the Add Food sheet show how many you have left, and the count resets at midnight local time. KidneyPal Pro removes the limit — see Subscription & Billing.
Out of analyses for the day? The prompt that appears offers Log without AI, which takes you straight to the free logging options — manual entry, saved foods, and recipes don’t use analyses.
A Word on Accuracy
Voice and text estimates depend entirely on your description — the AI can’t see the plate, so portion sizes are its best guess from what you tell it. Treat the numbers as good estimates, double-check anything that looks off with the Edit button, and keep following the targets your care team has set for you.